
Mailchimp Integration
In this article:
- Connect LGL to Mailchimp
- Add a new Mailchimp audience in LGL
- Use an existing Mailchimp audience in LGL
- Change the Mailchimp audience your LGL account is connected to
- What are automatic updates from Mailchimp?
- Connect LGL categories to Mailchimp groups and attributes
- Manage Mailchimp subscribers in LGL
- Send targeted emails to Mailchimp tags
- Use mailings to track targeted emails sent via Mailchimp
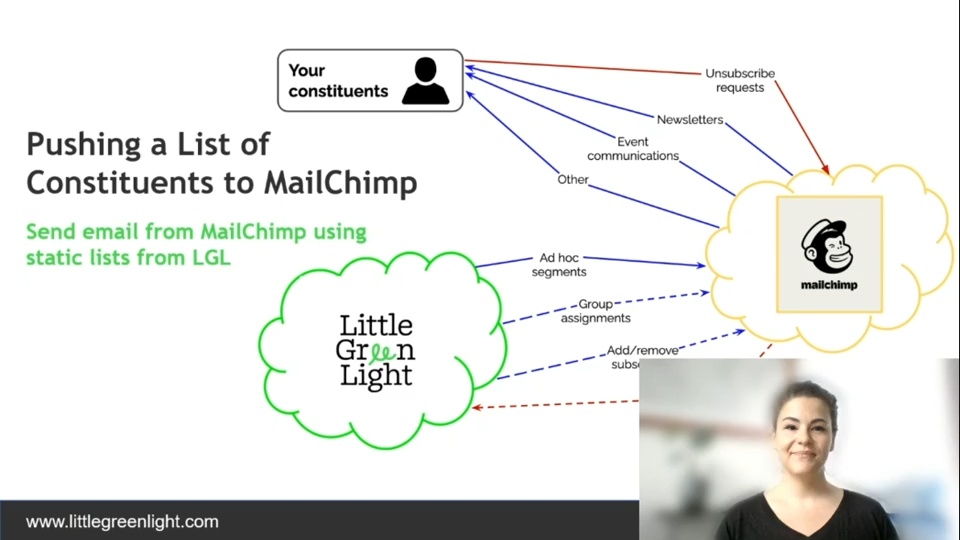
The integration between Little Green Light and Mailchimp allows you to manage your Mailchimp email marketing lists from within LGL, with the requirement that your LGL account be connected to one Mailchimp audience only.
After a simple setup/configuration within Mailchimp and LGL, you can then begin syncing information from your LGL account directly to Mailchimp.
The synchronization is a two-way process that allows you to:
- Add and remove constituents from your Mailchimp mailing lists
- Automatically receive updates when constituents unsubscribe or their email bounces (if the email address is no longer valid).
The process looks something like this:

IMPORTANT NOTES:
- LGL is not affiliated with Mailchimp in any way. The Mailchimp service is completely separate and carries its own pricing structure, terms of service, and privacy policy. Please see http://www.mailchimp.com/ for details.
- You must be an Administrator to use this feature in LGL. If you are not an Admin, you will not see any of these features.
Connect LGL to Mailchimp
This is a fairly simple process requiring a few steps:
- Create your Mailchimp account
- Set up an audience in Mailchimp to use for the integration
- Generate an API key
- Use the API key to connect your LGL account with Mailchimp
These steps are described below.
1. Create a Mailchimp account (if you don't already have one)
If you have a Mailchimp account already, you can skip to the API key section below.
If you don't have a Mailchimp account yet, create one here.
2. Set up your audience in Mailchimp to use for your LGL sync
Follow these instructions to create your audience in Mailchimp.
3. Generate and copy your Mailchimp API key
For both new and existing Mailchimp accounts, the next step is to generate your Mailchimp API key.
- To do that, click on the down arrow next to your username, then click Account.
 From there, click the Extras menu, and then choose API keys:

- Now scroll down the page a bit and click on the Create A Key button to generate your API key (unless you already have one). After the key is generated, copy the full text of the API key so that you can add it to your LGL account:


Or, if you already have a Mailchimp API key, copy it so that you can add it to your LGL account.
NOTE: We recommend setting the API key label to "LGL" in this case, so you'll be able to identify the API key later on (if you plan to use more than one).
4. Connect Mailchimp to your LGL account
Once you have your API key copied to your clipboard, you can set up the integration in LGL. Log into your LGL account and then:
- Go to Settings and click on the Integration Settings link
- Click on Mailchimp Integration
- Paste your Mailchimp API key into the form and click the Save button

Add a new Mailchimp audience in LGL
It is possible to sync your LGL account with one Mailchimp audience only. Now you can choose the Mailchimp audience you want to integrate from the menu, and click the Save button. (If you are new to Mailchimp, this is the audience you created previously, during the Mailchimp account setup process.)
If you already have an existing Mailchimp account with a mailing list that you want to copy over to LGL, choose the audience from your Mailchimp account that you want to copy over.

Use an existing Mailchimp audience in LGL
If you are integrating an existing Mailchimp account to your LGL account and there are subscribers in your Mailchimp account that you want to import into LGL, you'll need to export those subscribers from Mailchimp and then import that data into LGL.
Tip: When you import the file into LGL, make sure to set the Mailchimp status to "Subscribed" so that LGL will know to push the constituents back over to Mailchimp. Remember that LGL will push these Mailchimp subscribers over to the Mailchimp Audience that you designated when setting up the initial integration.
Resources:
- Mailchimp's Knowledge Base article on how to export subscribers
- LGL Knowledge Base article: Upload your import file
Change the Mailchimp audience your LGL account is connected to
If you want to replace your existing Mailchimp audience with a new one and connect that to LGL via your Mailchimp integration, please note that the subscription statuses of your constituents will not be preserved. In order to retain the subscription status to your old audience for your constituents, you can take the following steps:
- Before disconnecting your existing Mailchimp audience in your LGL-Mailchimp account integration, first search within your LGL account for everyone who has a Mailchimp status of "Subscribed":
- Export those records, making sure you include the LGL Constituent ID and the Mailchimp status fields:

- Save the report on your computer. You will import this data back into your account after your new Mailchimp audience has been added.
- In Mailchimp, remove your old audience and add your new audience. Connect your LGL account to your new Mailchimp audience.
- Import the file you had exported, bringing the Mailchimp status for the previously subscribed constituents. The Mailchimp status of "Subscribed" from your old audience will be restored in your LGL account for your new Mailchimp audience.


What are automatic updates from Mailchimp?
Updates made to Mailchimp (unsubscribes, bounces, updates, and new subscribers) are automatically pulled into your LGL Integration Queue. This process happens on a nightly basis and brings in any changes within the past 24 hours.
From the Integration Queue, you can accept these updates, which in turn will add or update your constituent information in LGL.
Connect LGL categories to Mailchimp groups and attributes
If you plan to send emails to different Mailchimp tags on a regular basis—such as to volunteers, alumni, or other groups—you can do so by setting up a connection between LGL categories and Mailchimp groups and/or attributes. This will allow you to send targeted emails from Mailchimp based on the subscriber categorization in LGL.
NOTE: Any time you make a change to a group or category in your LGL account that you are sending to in Mailchimp, it will be fully updated in Mailchimp as well.
You can do this by creating a group in Mailchimp for each category in LGL that you want to keep in sync. This can be done from the Category & Field Sync tab on your Mailchimp Integration page in LGL:

For example, if you allow subscribers to indicate their preferences for which types of communications they would like to receive, you might set up a Communications category in LGL and then link that category with your Mailchimp audience.
Link an LGL category to a Mailchimp group
This option is best when you have a smaller number of controlled values. In this case, linking the category to a Mailchimp group is the best way to go. The one limitation here is that you can only have 60 group values total in Mailchimp.
To connect the category to Mailchimp, check the "Sync to Mailchimp?" checkbox, and then choose the "Sync as" option: MailChimp Group and click the Save button:

Any constituents in LGL that you subscribe to Mailchimp will carry their category values over during the sync process.
NOTE: You should manage the values in this category from within LGL. Any time you add, change, or delete a value from a linked category, these changes will be reflected in Mailchimp, but the reverse is not true.
Link an LGL category to a Mailchimp attribute
This option is best if you have a category with a lot of values. You can link these as above, but choose the Mailchimp "Text attribute" as the "Sync as" type.
What information will get pushed over to Mailchimp?
By default, LGL pushes over First name, Last name, and Email address. The Email address we send is the "preferred" email address (or the top one listed in the constituent record). We only send one email address over per record. If you change which email address is "preferred" in a record that is already subscribed to Mailchimp, then we will edit the record in Mailchimp so the new preferred email address overwrites the old one.
Manage Mailchimp subscribers in LGL
Setting up the Mailchimp integration automatically creates a Mailchimp status category. Only those constituents with a Mailchimp status of "Subscribed" will be synced to Mailchimp.
Restrictions on which constituents can be synced to Mailchimp
LGL will prevent you from subscribing any constituent who can't or doesn't want to receive email. Therefore, you will not be able to subscribe any constituent who meets any of the following criteria:
- They have the special "Do not email" tag set
- They have unsubscribed via Mailchimp
- Their email address is not valid or has bounced
If you have Mailchimp subscribers in LGL and they are marked as "do not email", be advised that LGL does not automatically change their status in Mailchimp.
Subscribing an individual constituent
To add individual constituents to Mailchimp, find them in a search (and then hover your cursor over the double dashes to reveal the Add button) or navigate to their Details page and add or edit their Mailchimp status there:


Removing one constituent from your synced Mailchimp Audience
To remove a constituent from the Mailchimp Audience you have synced with your LGL account, follow the same steps as above but change the status to "Removed".
Please note that this does not remove or "unsubscribe" someone from your entire Mailchimp account; it just removes them from the synced Audience. To delete an email or mark an email "Unsubscribed" in your Mailchimp account, you will need to find the constituent within your Mailchimp account and manually unsubscribe them.
Bulk subscribing constituents
You can subscribe any number of selected constituents to your Mailchimp audience. To do so, first search for the constituents you want to add, and then click the Select X button to select them. From there, you can click on the Bulk edit button and select "Update MailChimp Status":

Selecting this option pulls up a bulk edit process that allows you to change the Mailchimp status of all selected constituents:

Reviewing the status of your Mailchimp subscribers
There are two good places in LGL to review the status of your Mailchimp subscribers:
1. In the Constituents tab, you can use the filter lists on the left (below) and the Advanced Search box on the right (below) to review the status for your constituents and any mailing lists they're on (if you're using a category to manage mailing lists):

2. On the Integration Settings page for Mailchimp, you can see the "Record Progress" (has LGL pushed the record successfully to Mailchimp) and the "Record Status" that has been received back from Mailchimp based on their attempt to process the email address. You can click on these links to filter your results. We also show you the total of constituents "Currently in Mailchimp", which could include people who've been added directly via Mailchimp. Here's a screenshot:
Settings > Integration Settings > Mailchimp Integration

Send targeted emails to Mailchimp tags
For cases where you want to send a one-off email to a targeted list in Mailchimp but you don't want to create a category in LGL to sync to Mailchimp, you can set up Mailchimp tags. A good example is an email blast to everyone who donated in 2020. You wouldn't want to create an LGL category for this because it would not be a good data management practice to do so. However, you can easily build a list for this purpose and then sync it to a tag in Mailchimp. Follow the steps below for instructions.
NOTE: Anytime you make an update to a list synced to a Mailchimp tag (if anyone drops off the list or is added, for example), to make sure it is updated in Mailchimp you'll need to sync it manually from your Mailchimp Integration > Mailchimp Tags page, by clicking the "Sync to Mailchimp" button for the specific list.
Build a list in LGL
You can do this by first creating your list in LGL:

Subscribe everyone on the list
From there, you can subscribe everyone on the list (who is not excluded based on the restrictions mentioned above) by clicking the Subscribe X to Mailchimp button.

Link the LGL list to a tag in Mailchimp
You can link these constituents to a tag within Mailchimp:

And then you can sync it immediately:

NOTE: If you use Mailchimp tags on an ongoing basis, please be sure you resync them with Mailchimp if any amount of time has gone by since your last email to that segment. This is because the integration can automatically add constituents to the segment, but it won’t remove anyone. So if you want the list being used in the tag to be fully represented in Mailchimp, click the "Sync to MailChimp" button prior to sending to that tag.
Watch this brief video on how to push a constituent list to Mailchimp:
#wistia_chrome_276 #wistia_grid_282_wrapper .w-css-reset{font-size:14px;} #wistia_chrome_276 #wistia_grid_282_wrapper div.w-css-reset{box-sizing:inherit;box-shadow:none;color:inherit;display:block;float:none;font:inherit;font-family:inherit;font-style:normal;font-weight:normal;font-size:inherit;letter-spacing:0;line-height:inherit;margin:0;max-height:none;max-width:none;min-height:0;min-width:0;padding:0;position:static;text-decoration:none;text-transform:none;text-shadow:none;transition:none;word-wrap:normal;-webkit-tap-highlight-color:rgba(0,0,0,0);-webkit-user-select:none;-webkit-font-smoothing:antialiased} #wistia_chrome_276 #wistia_grid_282_wrapper span.w-css-reset{box-sizing:inherit;box-shadow:none;color:inherit;display:block;float:none;font:inherit;font-family:inherit;font-style:normal;font-weight:normal;font-size:inherit;letter-spacing:0;line-height:inherit;margin:0;max-height:none;max-width:none;min-height:0;min-width:0;padding:0;position:static;text-decoration:none;text-transform:none;text-shadow:none;transition:none;word-wrap:normal;-webkit-tap-highlight-color:rgba(0,0,0,0);-webkit-user-select:none;-webkit-font-smoothing:antialiased} #wistia_chrome_276 #wistia_grid_282_wrapper ul.w-css-reset{box-sizing:inherit;box-shadow:none;color:inherit;display:block;float:none;font:inherit;font-family:inherit;font-style:normal;font-weight:normal;font-size:inherit;letter-spacing:0;line-height:inherit;margin:0;max-height:none;max-width:none;min-height:0;min-width:0;padding:0;position:static;text-decoration:none;text-transform:none;text-shadow:none;transition:none;word-wrap:normal;-webkit-tap-highlight-color:rgba(0,0,0,0);-webkit-user-select:none;-webkit-font-smoothing:antialiased} #wistia_chrome_276 #wistia_grid_282_wrapper li.w-css-reset{box-sizing:inherit;box-shadow:none;color:inherit;display:block;float:none;font:inherit;font-family:inherit;font-style:normal;font-weight:normal;font-size:inherit;letter-spacing:0;line-height:inherit;margin:0;max-height:none;max-width:none;min-height:0;min-width:0;padding:0;position:static;text-decoration:none;text-transform:none;text-shadow:none;transition:none;word-wrap:normal;-webkit-tap-highlight-color:rgba(0,0,0,0);-webkit-user-select:none;-webkit-font-smoothing:antialiased} #wistia_chrome_276 #wistia_grid_282_wrapper label.w-css-reset{box-sizing:inherit;box-shadow:none;color:inherit;display:block;float:none;font:inherit;font-family:inherit;font-style:normal;font-weight:normal;font-size:inherit;letter-spacing:0;line-height:inherit;margin:0;max-height:none;max-width:none;min-height:0;min-width:0;padding:0;position:static;text-decoration:none;text-transform:none;text-shadow:none;transition:none;word-wrap:normal;-webkit-tap-highlight-color:rgba(0,0,0,0);-webkit-user-select:none;-webkit-font-smoothing:antialiased} #wistia_chrome_276 #wistia_grid_282_wrapper fieldset.w-css-reset{box-sizing:inherit;box-shadow:none;color:inherit;display:block;float:none;font:inherit;font-family:inherit;font-style:normal;font-weight:normal;font-size:inherit;letter-spacing:0;line-height:inherit;margin:0;max-height:none;max-width:none;min-height:0;min-width:0;padding:0;position:static;text-decoration:none;text-transform:none;text-shadow:none;transition:none;word-wrap:normal;-webkit-tap-highlight-color:rgba(0,0,0,0);-webkit-user-select:none;-webkit-font-smoothing:antialiased} #wistia_chrome_276 #wistia_grid_282_wrapper button.w-css-reset{box-sizing:inherit;box-shadow:none;color:inherit;display:block;float:none;font:inherit;font-family:inherit;font-style:normal;font-weight:normal;font-size:inherit;letter-spacing:0;line-height:inherit;margin:0;max-height:none;max-width:none;min-height:0;min-width:0;padding:0;position:static;text-decoration:none;text-transform:none;text-shadow:none;transition:none;word-wrap:normal;-webkit-tap-highlight-color:rgba(0,0,0,0);-webkit-user-select:none;-webkit-font-smoothing:antialiased} #wistia_chrome_276 #wistia_grid_282_wrapper img.w-css-reset{box-sizing:inherit;box-shadow:none;color:inherit;display:block;float:none;font:inherit;font-family:inherit;font-style:normal;font-weight:normal;font-size:inherit;letter-spacing:0;line-height:inherit;margin:0;max-height:none;max-width:none;min-height:0;min-width:0;padding:0;position:static;text-decoration:none;text-transform:none;text-shadow:none;transition:none;word-wrap:normal;-webkit-tap-highlight-color:rgba(0,0,0,0);-webkit-user-select:none;-webkit-font-smoothing:antialiased} #wistia_chrome_276 #wistia_grid_282_wrapper a.w-css-reset{box-sizing:inherit;box-shadow:none;color:inherit;display:block;float:none;font:inherit;font-family:inherit;font-style:normal;font-weight:normal;font-size:inherit;letter-spacing:0;line-height:inherit;margin:0;max-height:none;max-width:none;min-height:0;min-width:0;padding:0;position:static;text-decoration:none;text-transform:none;text-shadow:none;transition:none;word-wrap:normal;-webkit-tap-highlight-color:rgba(0,0,0,0);-webkit-user-select:none;-webkit-font-smoothing:antialiased} #wistia_chrome_276 #wistia_grid_282_wrapper svg.w-css-reset{box-sizing:inherit;box-shadow:none;color:inherit;display:block;float:none;font:inherit;font-family:inherit;font-style:normal;font-weight:normal;font-size:inherit;letter-spacing:0;line-height:inherit;margin:0;max-height:none;max-width:none;min-height:0;min-width:0;padding:0;position:static;text-decoration:none;text-transform:none;text-shadow:none;transition:none;word-wrap:normal;-webkit-tap-highlight-color:rgba(0,0,0,0);-webkit-user-select:none;-webkit-font-smoothing:antialiased} #wistia_chrome_276 #wistia_grid_282_wrapper p.w-css-reset{box-sizing:inherit;box-shadow:none;color:inherit;display:block;float:none;font:inherit;font-family:inherit;font-style:normal;font-weight:normal;font-size:inherit;letter-spacing:0;line-height:inherit;margin:0;max-height:none;max-width:none;min-height:0;min-width:0;padding:0;position:static;text-decoration:none;text-transform:none;text-shadow:none;transition:none;word-wrap:normal;-webkit-tap-highlight-color:rgba(0,0,0,0);-webkit-user-select:none;-webkit-font-smoothing:antialiased} #wistia_chrome_276 #wistia_grid_282_wrapper a.w-css-reset{border:0;} #wistia_chrome_276 #wistia_grid_282_wrapper h1.w-css-reset{box-sizing:inherit;box-shadow:none;color:inherit;display:block;float:none;font:inherit;font-family:inherit;font-style:normal;font-weight:normal;font-size:2em;letter-spacing:0;line-height:inherit;margin:0;max-height:none;max-width:none;min-height:0;min-width:0;padding:0;position:static;text-decoration:none;text-transform:none;text-shadow:none;transition:none;word-wrap:normal;-webkit-tap-highlight-color:rgba(0,0,0,0);-webkit-user-select:none;-webkit-font-smoothing:antialiased} #wistia_chrome_276 #wistia_grid_282_wrapper h2.w-css-reset{box-sizing:inherit;box-shadow:none;color:inherit;display:block;float:none;font:inherit;font-family:inherit;font-style:normal;font-weight:normal;font-size:1.5em;letter-spacing:0;line-height:inherit;margin:0;max-height:none;max-width:none;min-height:0;min-width:0;padding:0;position:static;text-decoration:none;text-transform:none;text-shadow:none;transition:none;word-wrap:normal;-webkit-tap-highlight-color:rgba(0,0,0,0);-webkit-user-select:none;-webkit-font-smoothing:antialiased} #wistia_chrome_276 #wistia_grid_282_wrapper h3.w-css-reset{box-sizing:inherit;box-shadow:none;color:inherit;display:block;float:none;font:inherit;font-family:inherit;font-style:normal;font-weight:normal;font-size:1.17em;letter-spacing:0;line-height:inherit;margin:0;max-height:none;max-width:none;min-height:0;min-width:0;padding:0;position:static;text-decoration:none;text-transform:none;text-shadow:none;transition:none;word-wrap:normal;-webkit-tap-highlight-color:rgba(0,0,0,0);-webkit-user-select:none;-webkit-font-smoothing:antialiased} #wistia_chrome_276 #wistia_grid_282_wrapper p.w-css-reset{margin:1.4em 0;} #wistia_chrome_276 #wistia_grid_282_wrapper a.w-css-reset{display:inline;} #wistia_chrome_276 #wistia_grid_282_wrapper span.w-css-reset{display:inline;} #wistia_chrome_276 #wistia_grid_282_wrapper svg.w-css-reset{display:inline;} #wistia_chrome_276 #wistia_grid_282_wrapper ul.w-css-reset{box-sizing:inherit;box-shadow:none;color:inherit;display:block;float:none;font:inherit;font-family:inherit;font-style:normal;font-weight:normal;font-size:inherit;letter-spacing:0;line-height:inherit;margin:0;max-height:none;max-width:none;min-height:0;min-width:0;padding:0;position:static;text-decoration:none;text-transform:none;text-shadow:none;transition:none;word-wrap:normal;-webkit-tap-highlight-color:rgba(0,0,0,0);-webkit-user-select:none;-webkit-font-smoothing:antialiased;list-style-type:none} #wistia_chrome_276 #wistia_grid_282_wrapper ol.w-css-reset{box-sizing:inherit;box-shadow:none;color:inherit;display:block;float:none;font:inherit;font-family:inherit;font-style:normal;font-weight:normal;font-size:inherit;letter-spacing:0;line-height:inherit;margin:0;max-height:none;max-width:none;min-height:0;min-width:0;padding:0;position:static;text-decoration:none;text-transform:none;text-shadow:none;transition:none;word-wrap:normal;-webkit-tap-highlight-color:rgba(0,0,0,0);-webkit-user-select:none;-webkit-font-smoothing:antialiased;list-style-type:none} #wistia_chrome_276 #wistia_grid_282_wrapper li.w-css-reset{box-sizing:inherit;box-shadow:none;color:inherit;display:block;float:none;font:inherit;font-family:inherit;font-style:normal;font-weight:normal;font-size:inherit;letter-spacing:0;line-height:inherit;margin:0;max-height:none;max-width:none;min-height:0;min-width:0;padding:0;position:static;text-decoration:none;text-transform:none;text-shadow:none;transition:none;word-wrap:normal;-webkit-tap-highlight-color:rgba(0,0,0,0);-webkit-user-select:none;-webkit-font-smoothing:antialiased;list-style-type:none} #wistia_chrome_276 #wistia_grid_282_wrapper ul:before.w-css-reset{display:none} #wistia_chrome_276 #wistia_grid_282_wrapper ol:before.w-css-reset{display:none} #wistia_chrome_276 #wistia_grid_282_wrapper li:before.w-css-reset{display:none} #wistia_chrome_276 #wistia_grid_282_wrapper ul:after.w-css-reset{display:none} #wistia_chrome_276 #wistia_grid_282_wrapper ol:after.w-css-reset{display:none} #wistia_chrome_276 #wistia_grid_282_wrapper li:after.w-css-reset{display:none} #wistia_chrome_276 #wistia_grid_282_wrapper label.w-css-reset{background-attachment:scroll;background-color:transparent;background-image:none;background-position:0 0;background-repeat:no-repeat;background-size:100% 100%;float:none;outline:none} #wistia_chrome_276 #wistia_grid_282_wrapper button.w-css-reset{background-attachment:scroll;background-color:transparent;background-image:none;background-position:0 0;background-repeat:no-repeat;background-size:100% 100%;border:0;border-radius:0;outline:none;position:static} #wistia_chrome_276 #wistia_grid_282_wrapper img.w-css-reset{border:0;display:inline-block;vertical-align:top;border-radius:0;outline:none;position:static} #wistia_chrome_276 #wistia_grid_282_wrapper .w-css-reset button::-moz-focus-inner{border: 0;} #wistia_chrome_276 #wistia_grid_282_wrapper .w-css-reset-tree {font-size:14px;} #wistia_chrome_276 #wistia_grid_282_wrapper .w-css-reset-tree div{box-sizing:inherit;box-shadow:none;color:inherit;display:block;float:none;font:inherit;font-family:inherit;font-style:normal;font-weight:normal;font-size:inherit;letter-spacing:0;line-height:inherit;margin:0;max-height:none;max-width:none;min-height:0;min-width:0;padding:0;position:static;text-decoration:none;text-transform:none;text-shadow:none;transition:none;word-wrap:normal;-webkit-tap-highlight-color:rgba(0,0,0,0);-webkit-user-select:none;-webkit-font-smoothing:antialiased} #wistia_chrome_276 #wistia_grid_282_wrapper .w-css-reset-tree span{box-sizing:inherit;box-shadow:none;color:inherit;display:block;float:none;font:inherit;font-family:inherit;font-style:normal;font-weight:normal;font-size:inherit;letter-spacing:0;line-height:inherit;margin:0;max-height:none;max-width:none;min-height:0;min-width:0;padding:0;position:static;text-decoration:none;text-transform:none;text-shadow:none;transition:none;word-wrap:normal;-webkit-tap-highlight-color:rgba(0,0,0,0);-webkit-user-select:none;-webkit-font-smoothing:antialiased} #wistia_chrome_276 #wistia_grid_282_wrapper .w-css-reset-tree ul{box-sizing:inherit;box-shadow:none;color:inherit;display:block;float:none;font:inherit;font-family:inherit;font-style:normal;font-weight:normal;font-size:inherit;letter-spacing:0;line-height:inherit;margin:0;max-height:none;max-width:none;min-height:0;min-width:0;padding:0;position:static;text-decoration:none;text-transform:none;text-shadow:none;transition:none;word-wrap:normal;-webkit-tap-highlight-color:rgba(0,0,0,0);-webkit-user-select:none;-webkit-font-smoothing:antialiased} #wistia_chrome_276 #wistia_grid_282_wrapper .w-css-reset-tree li{box-sizing:inherit;box-shadow:none;color:inherit;display:block;float:none;font:inherit;font-family:inherit;font-style:normal;font-weight:normal;font-size:inherit;letter-spacing:0;line-height:inherit;margin:0;max-height:none;max-width:none;min-height:0;min-width:0;padding:0;position:static;text-decoration:none;text-transform:none;text-shadow:none;transition:none;word-wrap:normal;-webkit-tap-highlight-color:rgba(0,0,0,0);-webkit-user-select:none;-webkit-font-smoothing:antialiased} #wistia_chrome_276 #wistia_grid_282_wrapper .w-css-reset-tree label{box-sizing:inherit;box-shadow:none;color:inherit;display:block;float:none;font:inherit;font-family:inherit;font-style:normal;font-weight:normal;font-size:inherit;letter-spacing:0;line-height:inherit;margin:0;max-height:none;max-width:none;min-height:0;min-width:0;padding:0;position:static;text-decoration:none;text-transform:none;text-shadow:none;transition:none;word-wrap:normal;-webkit-tap-highlight-color:rgba(0,0,0,0);-webkit-user-select:none;-webkit-font-smoothing:antialiased} #wistia_chrome_276 #wistia_grid_282_wrapper .w-css-reset-tree fieldset{box-sizing:inherit;box-shadow:none;color:inherit;display:block;float:none;font:inherit;font-family:inherit;font-style:normal;font-weight:normal;font-size:inherit;letter-spacing:0;line-height:inherit;margin:0;max-height:none;max-width:none;min-height:0;min-width:0;padding:0;position:static;text-decoration:none;text-transform:none;text-shadow:none;transition:none;word-wrap:normal;-webkit-tap-highlight-color:rgba(0,0,0,0);-webkit-user-select:none;-webkit-font-smoothing:antialiased} #wistia_chrome_276 #wistia_grid_282_wrapper .w-css-reset-tree button{box-sizing:inherit;box-shadow:none;color:inherit;display:block;float:none;font:inherit;font-family:inherit;font-style:normal;font-weight:normal;font-size:inherit;letter-spacing:0;line-height:inherit;margin:0;max-height:none;max-width:none;min-height:0;min-width:0;padding:0;position:static;text-decoration:none;text-transform:none;text-shadow:none;transition:none;word-wrap:normal;-webkit-tap-highlight-color:rgba(0,0,0,0);-webkit-user-select:none;-webkit-font-smoothing:antialiased} #wistia_chrome_276 #wistia_grid_282_wrapper .w-css-reset-tree img{box-sizing:inherit;box-shadow:none;color:inherit;display:block;float:none;font:inherit;font-family:inherit;font-style:normal;font-weight:normal;font-size:inherit;letter-spacing:0;line-height:inherit;margin:0;max-height:none;max-width:none;min-height:0;min-width:0;padding:0;position:static;text-decoration:none;text-transform:none;text-shadow:none;transition:none;word-wrap:normal;-webkit-tap-highlight-color:rgba(0,0,0,0);-webkit-user-select:none;-webkit-font-smoothing:antialiased} #wistia_chrome_276 #wistia_grid_282_wrapper .w-css-reset-tree a{box-sizing:inherit;box-shadow:none;color:inherit;display:block;float:none;font:inherit;font-family:inherit;font-style:normal;font-weight:normal;font-size:inherit;letter-spacing:0;line-height:inherit;margin:0;max-height:none;max-width:none;min-height:0;min-width:0;padding:0;position:static;text-decoration:none;text-transform:none;text-shadow:none;transition:none;word-wrap:normal;-webkit-tap-highlight-color:rgba(0,0,0,0);-webkit-user-select:none;-webkit-font-smoothing:antialiased} #wistia_chrome_276 #wistia_grid_282_wrapper .w-css-reset-tree svg{box-sizing:inherit;box-shadow:none;color:inherit;display:block;float:none;font:inherit;font-family:inherit;font-style:normal;font-weight:normal;font-size:inherit;letter-spacing:0;line-height:inherit;margin:0;max-height:none;max-width:none;min-height:0;min-width:0;padding:0;position:static;text-decoration:none;text-transform:none;text-shadow:none;transition:none;word-wrap:normal;-webkit-tap-highlight-color:rgba(0,0,0,0);-webkit-user-select:none;-webkit-font-smoothing:antialiased} #wistia_chrome_276 #wistia_grid_282_wrapper .w-css-reset-tree p{box-sizing:inherit;box-shadow:none;color:inherit;display:block;float:none;font:inherit;font-family:inherit;font-style:normal;font-weight:normal;font-size:inherit;letter-spacing:0;line-height:inherit;margin:0;max-height:none;max-width:none;min-height:0;min-width:0;padding:0;position:static;text-decoration:none;text-transform:none;text-shadow:none;transition:none;word-wrap:normal;-webkit-tap-highlight-color:rgba(0,0,0,0);-webkit-user-select:none;-webkit-font-smoothing:antialiased} #wistia_chrome_276 #wistia_grid_282_wrapper .w-css-reset-tree a{border:0;} #wistia_chrome_276 #wistia_grid_282_wrapper .w-css-reset-tree h1{box-sizing:inherit;box-shadow:none;color:inherit;display:block;float:none;font:inherit;font-family:inherit;font-style:normal;font-weight:normal;font-size:2em;letter-spacing:0;line-height:inherit;margin:0;max-height:none;max-width:none;min-height:0;min-width:0;padding:0;position:static;text-decoration:none;text-transform:none;text-shadow:none;transition:none;word-wrap:normal;-webkit-tap-highlight-color:rgba(0,0,0,0);-webkit-user-select:none;-webkit-font-smoothing:antialiased} #wistia_chrome_276 #wistia_grid_282_wrapper .w-css-reset-tree h2{box-sizing:inherit;box-shadow:none;color:inherit;display:block;float:none;font:inherit;font-family:inherit;font-style:normal;font-weight:normal;font-size:1.5em;letter-spacing:0;line-height:inherit;margin:0;max-height:none;max-width:none;min-height:0;min-width:0;padding:0;position:static;text-decoration:none;text-transform:none;text-shadow:none;transition:none;word-wrap:normal;-webkit-tap-highlight-color:rgba(0,0,0,0);-webkit-user-select:none;-webkit-font-smoothing:antialiased} #wistia_chrome_276 #wistia_grid_282_wrapper .w-css-reset-tree h3{box-sizing:inherit;box-shadow:none;color:inherit;display:block;float:none;font:inherit;font-family:inherit;font-style:normal;font-weight:normal;font-size:1.17em;letter-spacing:0;line-height:inherit;margin:0;max-height:none;max-width:none;min-height:0;min-width:0;padding:0;position:static;text-decoration:none;text-transform:none;text-shadow:none;transition:none;word-wrap:normal;-webkit-tap-highlight-color:rgba(0,0,0,0);-webkit-user-select:none;-webkit-font-smoothing:antialiased} #wistia_chrome_276 #wistia_grid_282_wrapper .w-css-reset-tree p{margin:1.4em 0;} #wistia_chrome_276 #wistia_grid_282_wrapper .w-css-reset-tree a{display:inline;} #wistia_chrome_276 #wistia_grid_282_wrapper .w-css-reset-tree span{display:inline;} #wistia_chrome_276 #wistia_grid_282_wrapper .w-css-reset-tree svg{display:inline;} #wistia_chrome_276 #wistia_grid_282_wrapper .w-css-reset-tree ul{box-sizing:inherit;box-shadow:none;color:inherit;display:block;float:none;font:inherit;font-family:inherit;font-style:normal;font-weight:normal;font-size:inherit;letter-spacing:0;line-height:inherit;margin:0;max-height:none;max-width:none;min-height:0;min-width:0;padding:0;position:static;text-decoration:none;text-transform:none;text-shadow:none;transition:none;word-wrap:normal;-webkit-tap-highlight-color:rgba(0,0,0,0);-webkit-user-select:none;-webkit-font-smoothing:antialiased;list-style-type:none} #wistia_chrome_276 #wistia_grid_282_wrapper .w-css-reset-tree ol{box-sizing:inherit;box-shadow:none;color:inherit;display:block;float:none;font:inherit;font-family:inherit;font-style:normal;font-weight:normal;font-size:inherit;letter-spacing:0;line-height:inherit;margin:0;max-height:none;max-width:none;min-height:0;min-width:0;padding:0;position:static;text-decoration:none;text-transform:none;text-shadow:none;transition:none;word-wrap:normal;-webkit-tap-highlight-color:rgba(0,0,0,0);-webkit-user-select:none;-webkit-font-smoothing:antialiased;list-style-type:none} #wistia_chrome_276 #wistia_grid_282_wrapper .w-css-reset-tree li{box-sizing:inherit;box-shadow:none;color:inherit;display:block;float:none;font:inherit;font-family:inherit;font-style:normal;font-weight:normal;font-size:inherit;letter-spacing:0;line-height:inherit;margin:0;max-height:none;max-width:none;min-height:0;min-width:0;padding:0;position:static;text-decoration:none;text-transform:none;text-shadow:none;transition:none;word-wrap:normal;-webkit-tap-highlight-color:rgba(0,0,0,0);-webkit-user-select:none;-webkit-font-smoothing:antialiased;list-style-type:none} #wistia_chrome_276 #wistia_grid_282_wrapper .w-css-reset-tree ul:before{display:none} #wistia_chrome_276 #wistia_grid_282_wrapper .w-css-reset-tree ol:before{display:none} #wistia_chrome_276 #wistia_grid_282_wrapper .w-css-reset-tree li:before{display:none} #wistia_chrome_276 #wistia_grid_282_wrapper .w-css-reset-tree ul:after{display:none} #wistia_chrome_276 #wistia_grid_282_wrapper .w-css-reset-tree ol:after{display:none} #wistia_chrome_276 #wistia_grid_282_wrapper .w-css-reset-tree li:after{display:none} #wistia_chrome_276 #wistia_grid_282_wrapper .w-css-reset-tree label{background-attachment:scroll;background-color:transparent;background-image:none;background-position:0 0;background-repeat:no-repeat;background-size:100% 100%;float:none;outline:none} #wistia_chrome_276 #wistia_grid_282_wrapper .w-css-reset-tree button{background-attachment:scroll;background-color:transparent;background-image:none;background-position:0 0;background-repeat:no-repeat;background-size:100% 100%;border:0;border-radius:0;outline:none;position:static} #wistia_chrome_276 #wistia_grid_282_wrapper .w-css-reset-tree img{border:0;display:inline-block;vertical-align:top;border-radius:0;outline:none;position:static} #wistia_chrome_276 #wistia_grid_282_wrapper .w-css-reset-tree button::-moz-focus-inner{border: 0;} #wistia_chrome_276 #wistia_grid_282_wrapper .w-css-reset-max-width-none-important{max-width:none!important} #wistia_chrome_276 #wistia_grid_282_wrapper .w-css-reset-button-important{border-radius:0!important;color:#fff!important;}
#wistia_grid_282_wrapper{-moz-box-sizing:content-box;-webkit-box-sizing:content-box;box-sizing:content-box;font-family:Arial,sans-serif;font-size:14px;height:100%;position:relative;text-align:left;width:100%;} #wistia_grid_282_wrapper *{-moz-box-sizing:content-box;-webkit-box-sizing:content-box;box-sizing:content-box;} #wistia_grid_282_above{position:relative;} #wistia_grid_282_main{display:block;height:100%;position:relative;} #wistia_grid_282_behind{height:100%;left:0;position:absolute;top:0;width:100%;} #wistia_grid_282_center{height:100%;overflow:hidden;position:relative;width:100%;} #wistia_grid_282_front{display:none;height:100%;left:0;position:absolute;top:0;width:100%;} #wistia_grid_282_top_inside{position:absolute;left:0;top:0;width:100%;} #wistia_grid_282_top{width:100%;position:absolute;bottom:0;left:0;} #wistia_grid_282_bottom_inside{position:absolute;left:0;bottom:0;width:100%;} #wistia_grid_282_bottom{width:100%;position:absolute;top:0;left:0;} #wistia_grid_282_left_inside{height:100%;position:absolute;left:0;top:0;} #wistia_grid_282_left{height:100%;position:absolute;right:0;top:0;} #wistia_grid_282_right_inside{height:100%;right:0;position:absolute;top:0;} #wistia_grid_282_right{height:100%;left:0;position:absolute;top:0;} #wistia_grid_282_below{position:relative;}
Use mailings to track targeted emails sent via Mailchimp
Learn how you can use targeted Mailings to track emails sent via Mailchimp.